FAQ - Door Access Series
Features and parameters with ★ are not available in all devices
Menu > User Management > New User > Input the ID > Enroll FP > Press Finger 3 times on the scanner > Press OK again to enroll another fingerprint (optional) > Press ESC after the enrollment is completed
Menu > User Management > New User > Input the ID > Enroll Password > Input Password & Confirm Password > Press OK
Menu > User Management > New User > Input the ID > Badge Number > Present the card.
Menu > User Management > Add user (For enrolled user, under "All User" selection, select Edit) > User Role, change the Normal User to Super Admin.
*Note: This will cause only the admin user will able to access the terminal menu.
Menu > User Management > All User > Select the user > Edit/Delete
Plug in the USB Flash Disk into terminal USB Port, then go to Menu > USB Manager > Download > Select User Data or Attendance Data
*Note:
User Data - User file
Attendance Data - Attendance file
Plug in the USB Flash Disk into terminal USB Port, then go to Menu > USB Manager > Upload > Upload User
Menu > Data Management > Delete Data > Delete Admin Role
Answer: Menu > Data Management > Delete Data > Delete Attendance Data
*Note: Download & backup the attendance log before delete all the attendance log is recommended.
Menu > Data Management > Delete Data > All Data
Menu > Comm. > Ethernet > IP Address
To check WiFi IP Address:
Menu > Comm. > Wireless Network > Advanced > IP Address
Menu > Comm. > PC Connection > Device ID
Menu > System Info > Device Capacity
Menu > System Info > Device Info
Menu > Attendance Search > Input the Employee ID and Press OK > Select the Time Range and Press OK
Menu > System > Date & Time > Set Date (adjust date) or Set Time (Adjust time)
Menu > System > Fingerprint > 1:N Threshold Value
Menu > System > Fingerprint > FP Sensor Sensitivity
Menu > System > Attendance > Duplicate Punch Period(m)
Menu > System > Attendance > Periodic Del of ATT Data
Menu > Access Control > Time Schedule
To apply the Time Schedule to the User:
Menu > User Management > New User (Select "All User" if the user is enrolled) > Access Control Role > Apply Group Time Period Set to "Off" > Select the Time Period
*Note: Each user can set a maximum of 3 time schedule
Menu > Access Control > Access Group
To apply the Access Group to the User:
Menu > User Management > New User (Select "All User" if the user is enrolled) > Access Control Role > Select the Access Group Number > Apply Group Time Period Set to "Yes"
Menu > Access Control > Anti-passback Setup > In/Out Anti-Passback
Method 1: Press the Reset Button on the terminal.
Method 2: If your terminal device is connected to network,
1. Open ECOTIMEPRINT ETA2 system on your pc, go to Terminal Setup > Device Setup
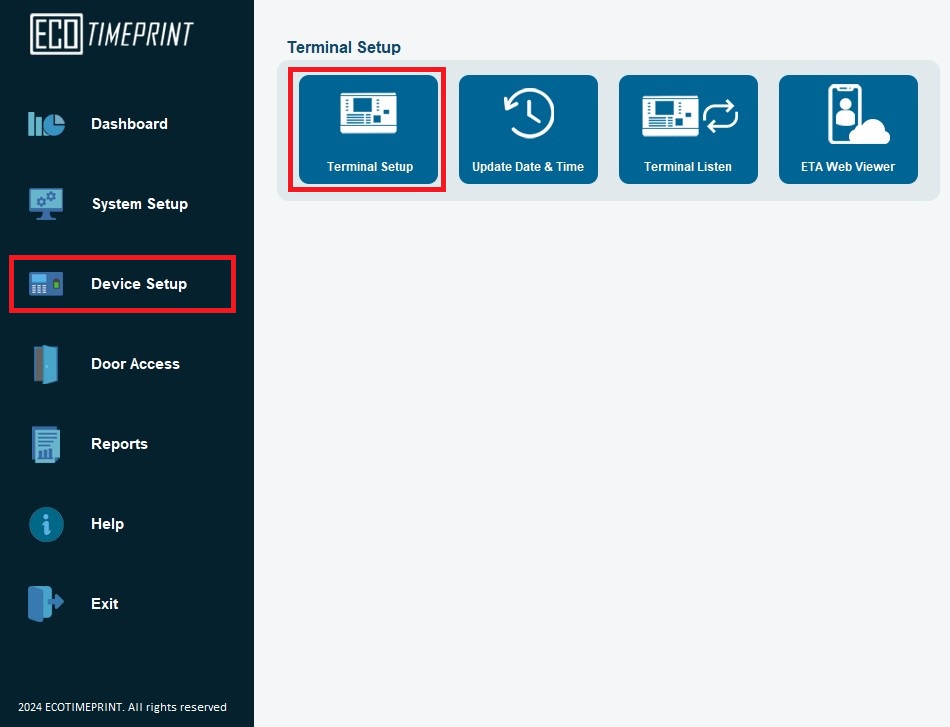
2. Select the terminal and click Device Manager
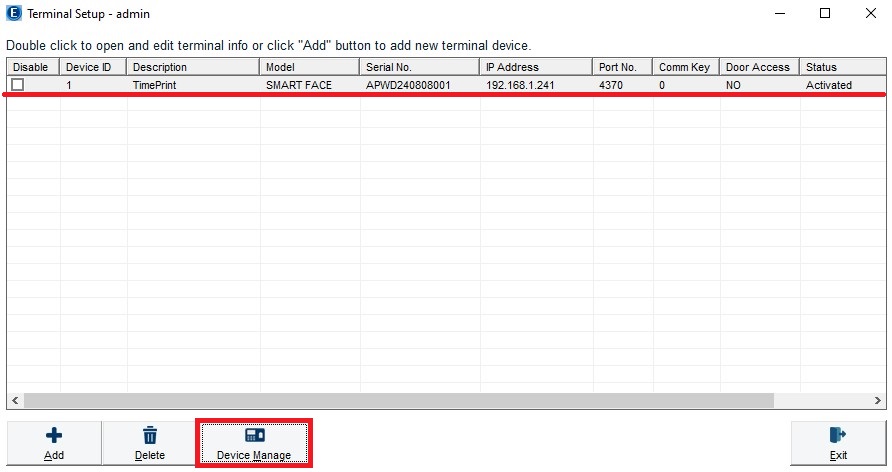
3. Make sure the IP Address is correct and click Connect
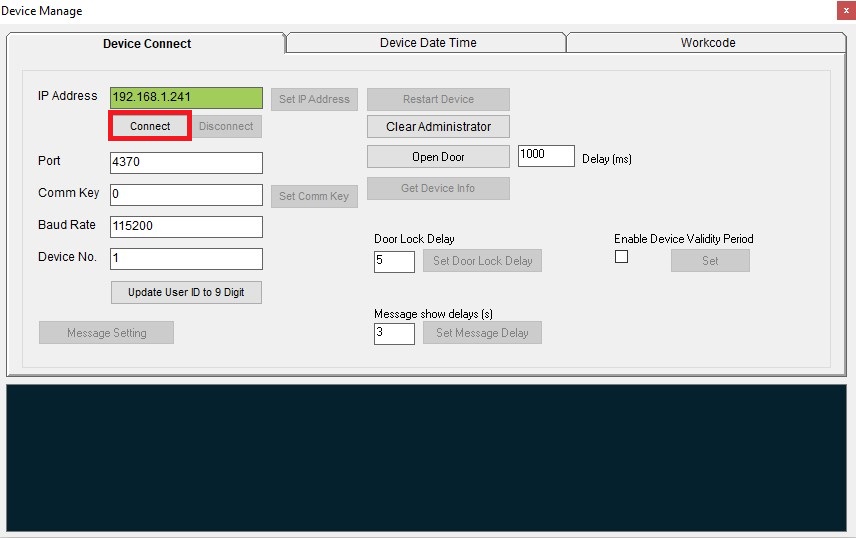
4. Click Restart

Please follow the steps below:
1. Check if the wiring diagram is matched with the diagram below.
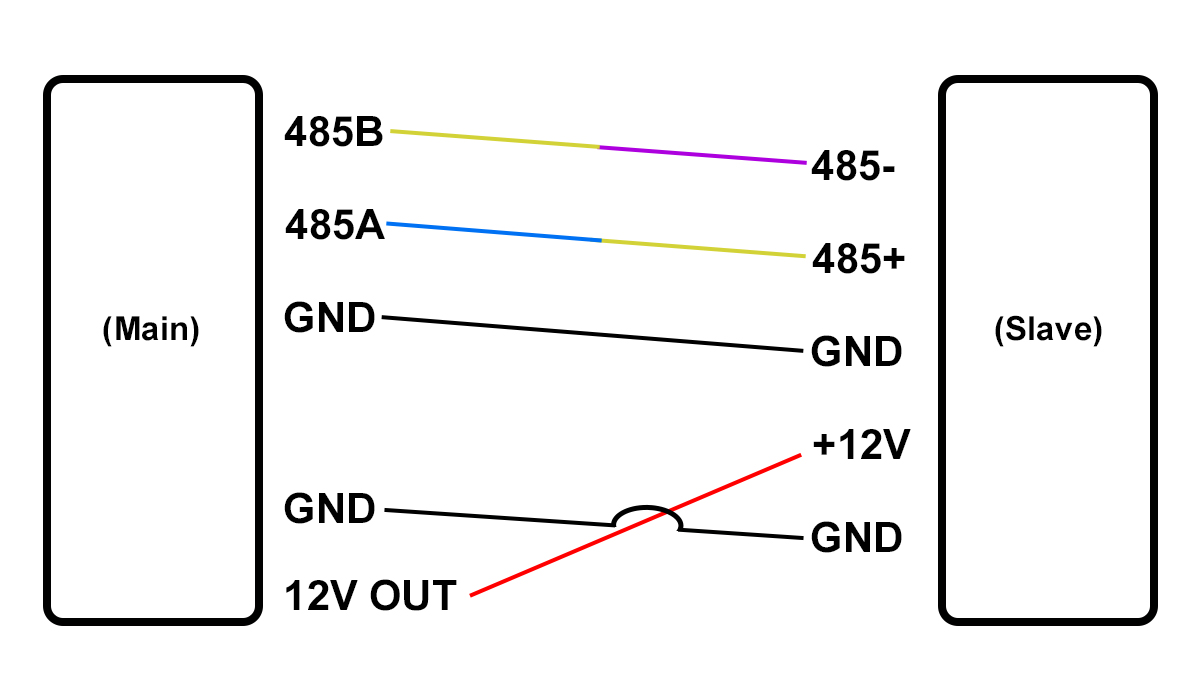
2. On main unit, go to Menu > Comm > Serial Comm > Serial Port > Make sure it is selected "Master Unit"
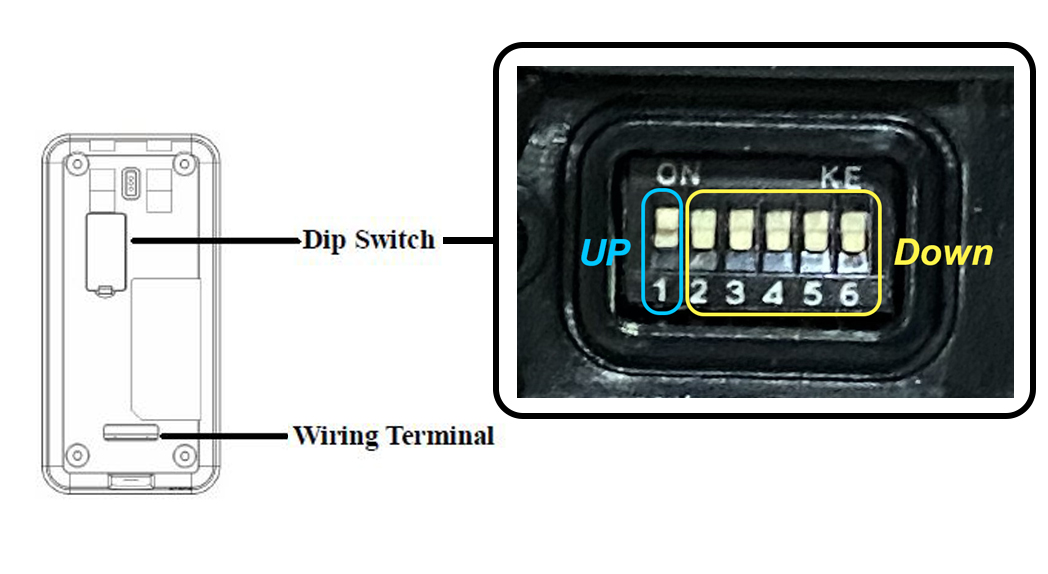
3. On the back side of slave unit, make sure the dip switch for number 1 is UP, the rest 2-6 is down. Please proceed to next step if the toggle switch is correct. (If your device don have dip switch, please skip this step)
4. Restart both main & slave unit
If your terminal is connected via network:
1. Open ECOTIMEPRINT ETA2 system on your pc, go to Terminal Setup > Device Setup
2. Select the terminal and click Device Manager
3. Make sure the IP Address is correct and click Connect
4. Click clear administrator
If your terminal is not connected to network:
1. Power Off the Device
2. Power On the Device while Pressing the Tamper Switch
3. Release the Tamper Switch once the Device Completely boots up and main screen appears.
4. Once you are in the Main Screen wait between 30-40 Seconds and press the Menu button.
5. Now you will be able to enter to the Menu and you will be able to remove the Admin Password or Admin Privileges.
To remove admin:
Go to Menu > Data Mgt > Delete Data > Delete Admin Role
Step 1: Make sure the USB Flash Disk have enough space available & under FAT32 format. (USB Flash Disk with 32GB or lower is recommended)
Step 2: Restart the terminal device, then plug in the USB Flash Disk and try download again.
Note: For 5V terminal device, make sure the power adapter has balanced ampere.
There is a high likelihood that this issue is due to a failure of the CMOS battery in the terminal device. Please contact your vendor to replace the CMOS Battery.